
After writing my previous post in this Minimal March series, it was pointed out to me that my approach is still a little bit of ‘gatekeeping‘. I was using a very expensive machine with lots of memory and drive space in a virtual machine. What about those folks that don’t have access to these resources? Let’s knock down those doors and show that ANYONE ANYWHERE can be a .NET developer.
I set the following parameters for myself, to ensure that I was getting a computer that just about anyone could acquire:
- Purchase a laptop at my local discount retail shop, a Walmart in my case.
- Spend less than $200
- It must be a Chromebook – this is now very common in high-schools here in the US
- Configure it with .NET developer tools and work on productive software on my Twitch stream
… and it worked.
Urban Dictionary defines Gatekeeping as the following:
When someone takes it upon themselves to decide who does or does not have access or rights to a community or identity.
Urban dictionary
I’ve seen this in our technical and software development communities on Twitter, Reddit, in-person, and even at conferences. Teens and college graduates are again and again told that they can’t be considered a ‘real developer’ unless they use technology X where X is the “cool” or “hip” tools to use this month. How many developers do you see in the San Francisco area that DON’T carry Mac laptops? At Microsoft technology events, how many presenters are carrying a Surface Book?
For a developer presentation at an event, it is GOOD to have a fast, brand-name machine so that your demos work quickly and you can get access to spare parts easily should something go wrong. If you’re someone interested in getting started in software, there is NO NEED to spend $3,000 on that fully-loaded Mac Book, Alienware, or Surface Book. Let’s get started with something simple, something you can access without taking out a loan.
Yes, we could build a machine around a Raspberry Pi. That would require some technical knowledge, acquiring a display, adding a keyboard and mouse, and not being at all practical for students or developers to carry with them to school, the local coffee shop, or the office.
The Walmart Challenge
Walmart has a great cross-section of technology at their retail stores. You can find iPhones, Playstation 4, XBox, laptops and other expensive systems right next to very inexpensive Android phones, tablets, and Chromebooks. Every town in North America has at least one Walmart, and I visited my local store on Monday evening this week in search of a bargain.
I did a quick walk through the computer section and looked at the candidates. Here is what I found:
… and I settled on this HP Chromebook 14, saving $50 off the list price and coming in JUST under my $200 budget.
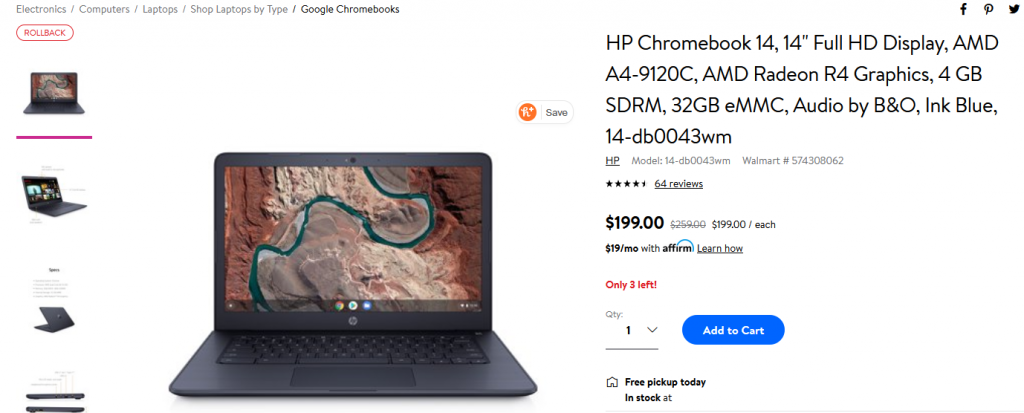
4GB of RAM and 32GB of drive space with an AMD A4. This would be a tight fit, but we should be able to write code and build web applications on it.
Installing Linux
“Installing” is probably the wrong term and “Activating” is the better term now. With the latest versions of ChromeOS, Google now has instructions for installing Linux on your Chromebook available. I couldn’t believe that it would be THIS easy:
After a few minutes, I had a terminal running that had ALL of the Linux features I wanted. I couldn’t believe it was that easy… but there are some limitations:
- That Linux instance is running inside of a container
- It’s named ‘penguin’ and as much as you might want to rename it, that penguin name is going to come back
- Interactions with the Chrome UI aren’t easy
- Forget about fonts
Those last two items were a little hard for me. I have a set of fonts that I like to use while developing, and I fought the good fight.
Fonts, Developer Mode and Bricks
There currently is no way to install fonts on ChromeOS through the native menu and user-interface. After some searching online, I found some instructions about rebuilding the hard drive in ‘developer mode’. The steps for this are not hard to follow, but require you to change the drive partition that ChromeOS boots from. Furthermore, developer-mode requires you to use a Ctrl+d keystroke to activate the machine at boot time. When you configure developer-mode you will be presented this screen:

With developer mode activated, you can read and write to the entire disk. Brilliant! I can copy my fonts into an appropriate folder and activate them. After placing them in the /usr/local/share/fonts folder and fighting with font utilities for about an hour, I shut down the machine and went to dinner.
When I returned, I accidentally pressed the spacebar INSTEAD of Ctrl+d to activate my Chromebook… and this happened:
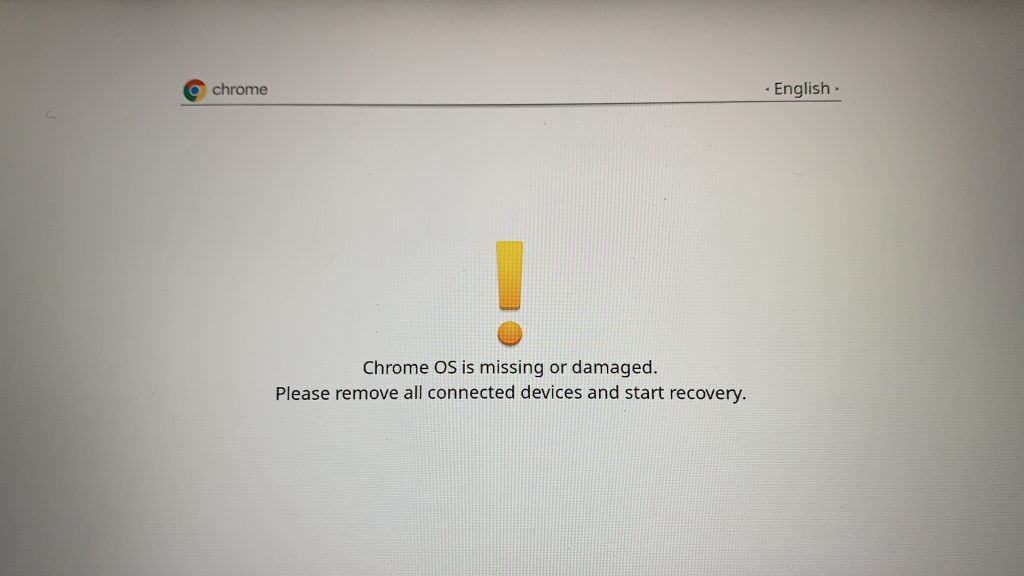
Fortunately, there is a very well documented system restore process for ChromeOS. After restoring the OS, I decided to abandon Developer Mode going forward.
FiraCode in the ChromeOS Terminal
The ChromeOS terminal is actually more akin to a web page that you can format with CSS. It’s not, in my exploration, able to see into the files and folders on your Linux container running in the terminal. However, you can configure it with some custom CSS to use fonts that are available on the web.
The folks working on the FiraCode font made directions available to add their font as a font-family and CSS markup to enable it in the terminal. It’s not perfect, but now my eyes are more at rest with the font-ligatures and fixed-width text for coding.
Adding my Linux Configuration
I took my previous configuration from my last blog post and stashed it on my GitHub as a repository called dotfiles that I could download to any machine with a git client. I added my current .bashrc, .vimrc, and wallpapers to the repository and copied the git commands from my previous blog post into a series of scripts to help me fetch and configure the plugins for vim.
Once the repository was cloned locally, I ran the scripts in the /bin folder and I had Omnisharp, EditorConfig, and the NERDTree plugins installed along with my fonts downloaded, and the git features for my prompt configured.
Installing the .NET SDK
The .NET SDK was just as easy to install as it was in my previous blog post, and the same instructions from my installation in a Linux VM worked again. This time, instead of getting a 64-bit version of the SDK, I got an AMD 64-bit optimized version. I can write the same code, target the same .NET Core libraries, and the appropriate runtime for my Chromebook would execute the code for me.
Performance
Performance, well this is where things start to slow down. This machine has a dual-core processor running at 1.8 GHz. Compiling and running my Blazor project and unit tests took a very long 20-30 seconds instead of the snappy 3 seconds that I was used to in the Linux VM.
It WORKED, and that’s the important part, but I think we can do better. I’m going to work on optimizing some build scripts to make this run quicker going forward.
Summary
I’m going to continue to work with this Chromebook for the rest of this week and probably next week as well. Let’s see how much performance we can squeeze out of this little machine and maybe even generate some scripts to help other developers who are working with similar machines and configurations.