
I’ve been streaming for 14 months now, and enjoying EVERY minute of it. The top question I get again and again is: how do you do it? what equipment, what software do you use? I had a previous post about the setup I use, but I’ve made so many upgrades and updates, I’ve got to share what I now use. Let’s take a look at how Jeff produces Twitch streams at the start of 2019.
Good Sound Gets Better…
I’ve upgraded my sound hardware.. no two ways about it, I got more professional gear in place for 2019. I now have an AudioTechnica AT2020 condensor microphone with a shockmount and pop filter on my microphone arm.
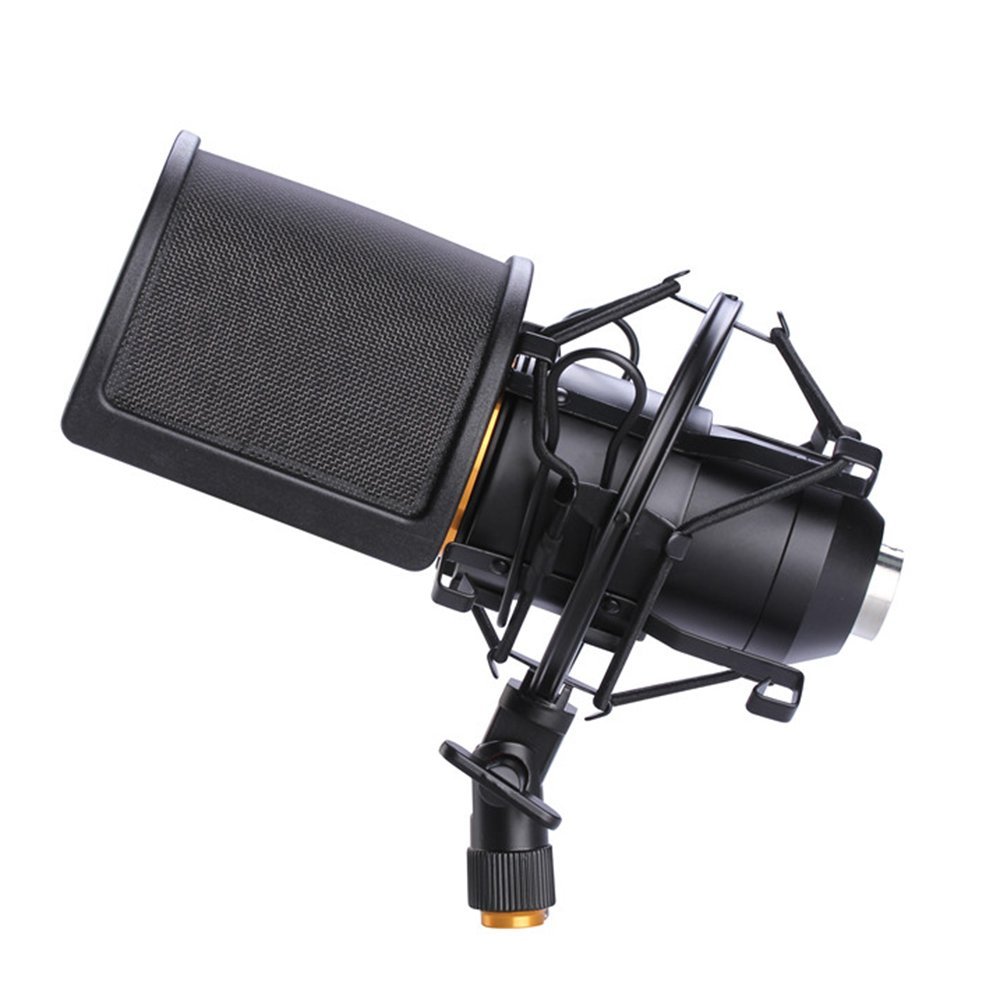
You’re going to ask me, and I know you are, “but Jeff, that microphone isn’t USB.. it uses this wackadoo XLR connector. What is that thing?” XLR is the standard microphone connector used in the audio industry, and connects to a sound mixer.
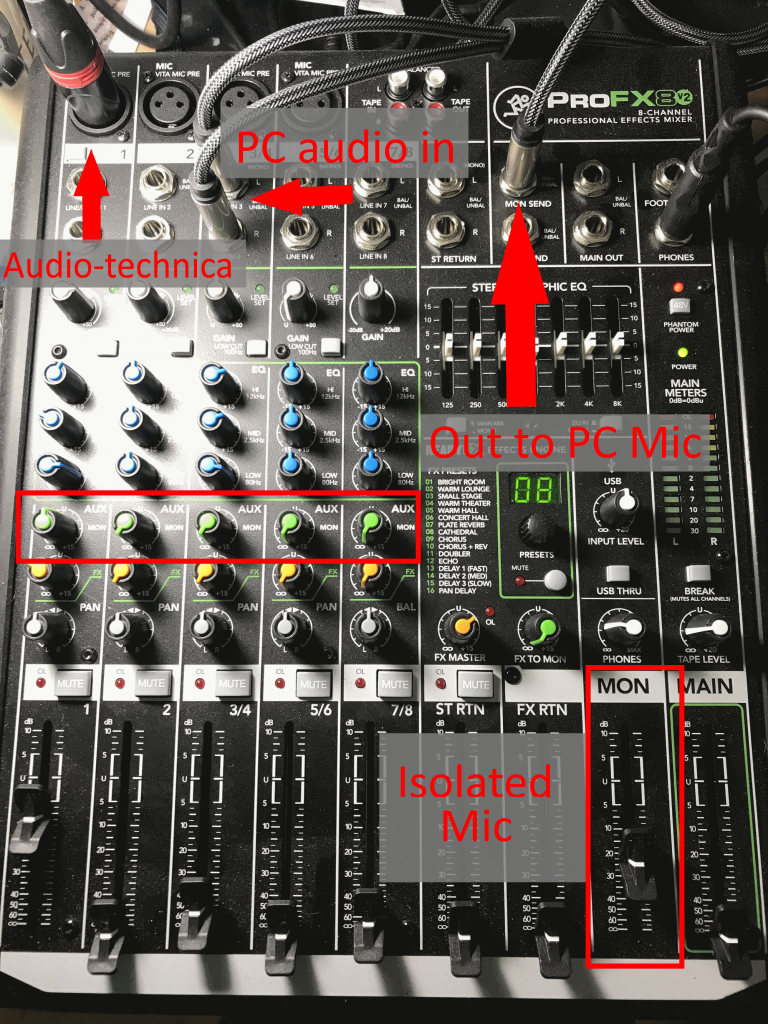
I now have a Mackie ProFx8v2 sound mixer installed in my home office and wired to my production machine. This mixer allows me to take the microphone and mix it with the PC sound and send it back into OBS for transmission to Twitch or recordings. The mixer has a USB connector, 2 auxiliary outputs, and an FX engine on-board.


Sound configuration
This is the tricky part, how to connect and get a GOOD mix out of the mixer and into OBS for streaming. Actually, how to get a good mix into ANYTHING on the PC.
First, I have my microphone on channel 1 of the mixer. This is my primary input, as everything else could go silent and I don’t care. The microphone is my primary concern. I have dialed in the gain, bass, and effects right where I want them for my voice.
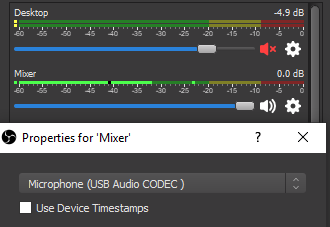
I have the Mixer’s USB connected to my PC, and that connection can both send AND receive audio. For my purposes, the USB is being used to SEND audio from the mixer to the PC. This is my “main output” and will deliver my final mix into OBS or any other application I choose.
I also have the standard 3.5mm microphone and speaker connectors from my PC connected into the mixer. The speaker of the PC is connected into channel 3, NOT channel 2. This way, I COULD put a second microphone into channel 2. I can also take the standard PC sounds OUT of anything that I send back to the PC. Like….
The microphone input on my PC is connected to the “monitor send” jack on the top of the mixer. This is the part I REALLY like… The green row of dials on the mixer’s channels are the “monitor volume”. I can control EXACTLY how much of each channel I send to the monitor. For ONLY my microphone, this is turned up. Everything else is turned to 0. This is how I do Skype / Teams / Discord calls with folks – I have those communication applications configured to use the microphone input that comes out of the monitor of the mixer. The rest of the system sounds are zeroed out with channel 3 muted.
My headphones are, naturally, connected to the “phones” jack so that I can hear the main mix sent over the USB connection. This also lets me hear the microphone as I speak into it with no delays, a VERY valuable feature. Don’t accept any delays in hearing your microphone in your headphones.
For things like Skype, I have the standard microphone and speakers jacks configured. From the mixer configuration, this is the monitor and my standard output going into channel 3 of the mixer.
Camera
I had not been happy with the quality of the picture from the HD920 webcam that I was using. I stepped up and grabbed the Razer Kiyo camera, which comes with a light-ring to help illuminate my face. This is really important to ensure that my face is lit separately from my green background.


I have updated my lighting by adding some RGB lights that help even out the green color on the screen behind me. These UStellar 15W RGB LED lights sit on the floor and point up at the screen with a green color and help ensure an even green color across my entire background.


These are in addition to the shop lights that I still use, reflecting white light off of the wall in front of me. They’re cheap and light me just enough to present a nice image on camera.
Computing Power
In May, I took a big step up in this department. I previously used two laptops in coordination to deliver my stream, and now I use one machine to make the whole production happen from my home office. I still use the two laptops when I travel, but the horsepower and video capabilities at home are far superior to my previous configuration.
I now use a Dell Precision 3620 with an i7-7700 and 4 cores for a total of 8 logical processors and 32GB of RAM. I’ve upgraded the video card from an Intel HD 630 to an NVidia GeForce GTX 1060. The video upgrade allows me to process and render my stream in HD at 60 frames per second much more reliably.
I now have only three displays that I use for the stream:
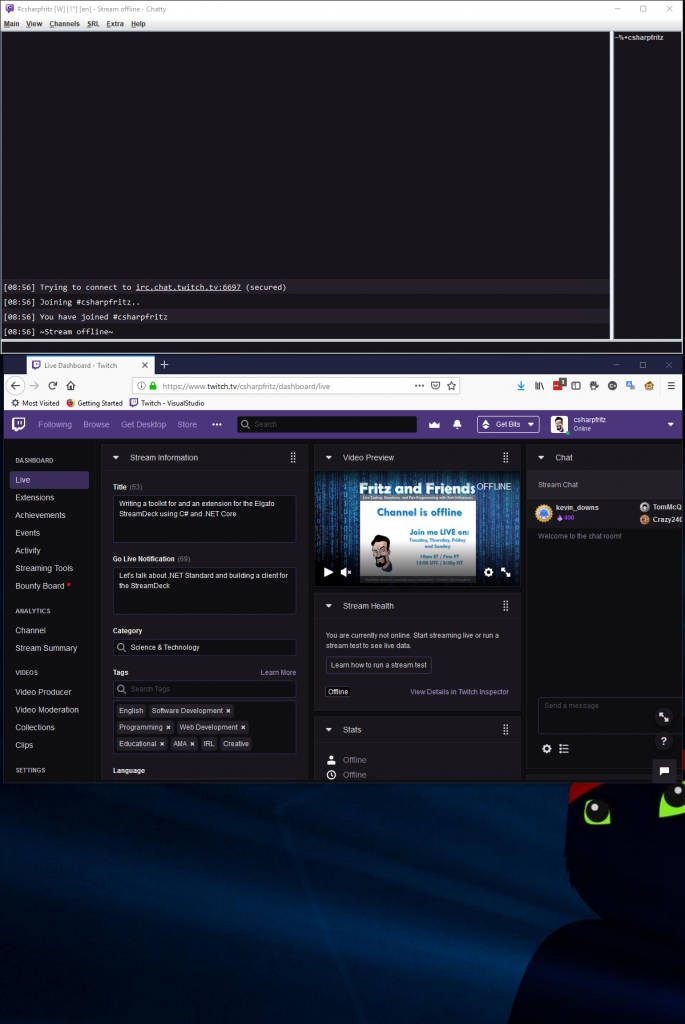
- The left display is 24-inch HD display in portrait mode with Chatty running at the top so that I can monitor Twitch chat. Below that, I have Firefox running with TweetDeck on one tab and the Twitch dashboard on a second tab. This way I can keep tabs on social media and the stream quality during the stream. This also produces the fun effect such that when I turn to read chat, it looks like I am looking at the embedded chat in the rendered video.
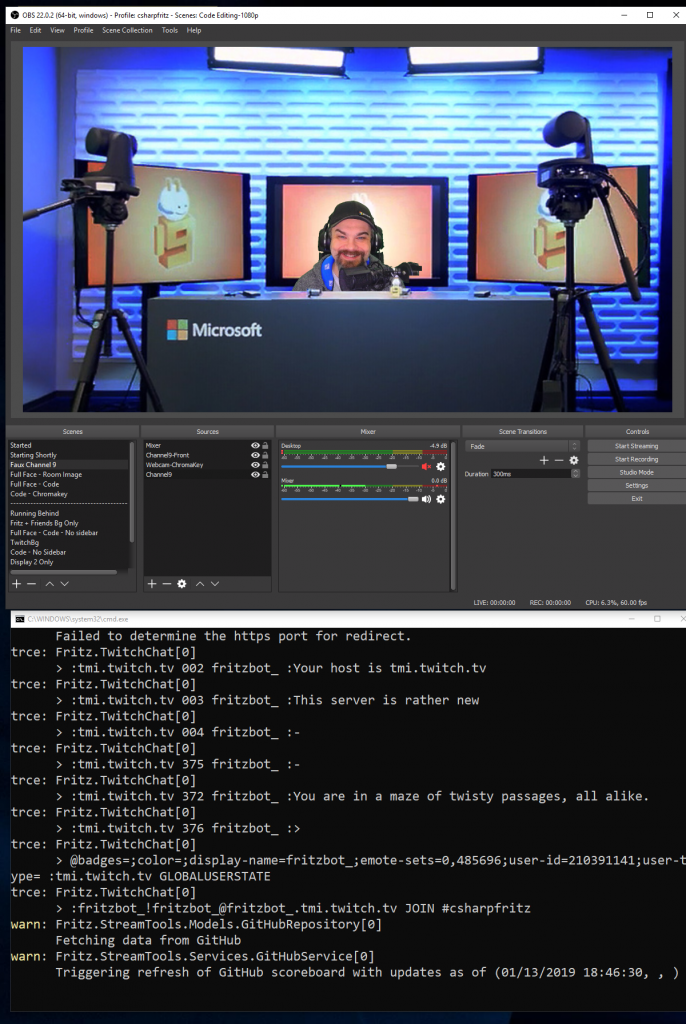
- My second display, to the right of center is where I have OBS and my Fritz.StreamTools console. You’ll see me glance over at this screen occasionally to verify the layout and video quality.
- My final display is my ‘stage’ that you see when I show my screen on stream. It’s a 27″ HD display with whatever content we decide to work on and is placed directly in front of me with the webcam mounted on top of it.
Keyboard
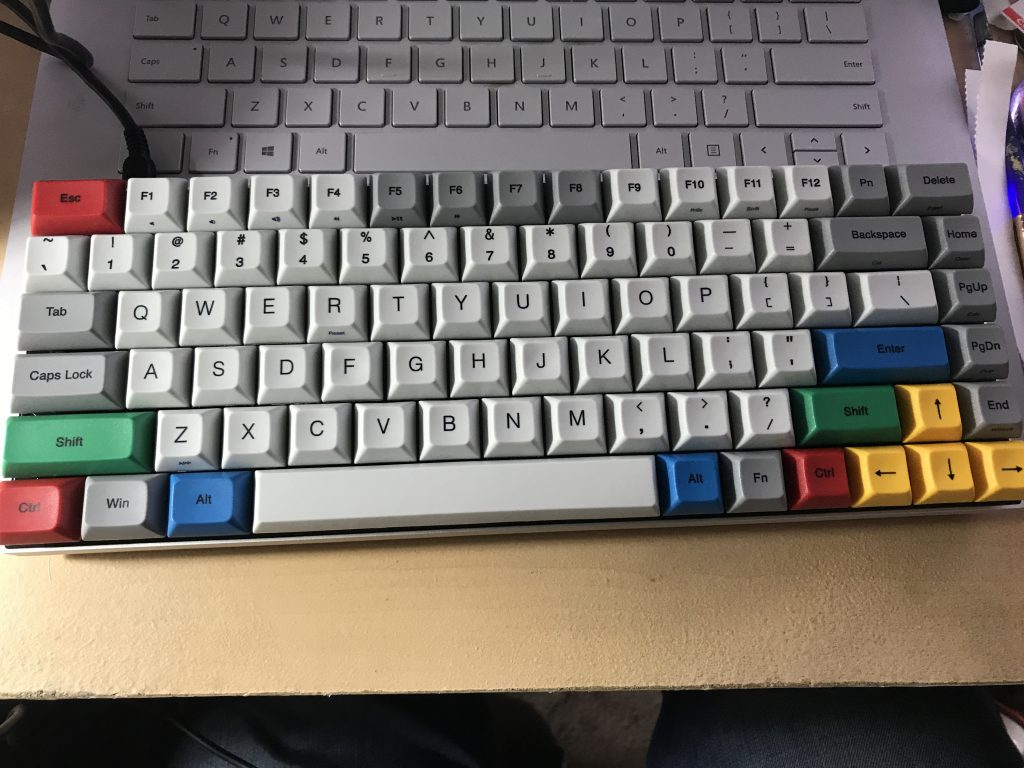
I have a very clicky keyboard and that is either music to some folks ears, or like Mrs. CsharpFritz that’s a real pain to listen to. I use a Vortex Race 3 and have previously written about my unboxing experience. I continue to love this keyboard, and its Cherry MX Blue switches.
Auxiliary Video
Occasionally, I’ll need to import video from another device. This is how I displayed my Mac when I coded in May, and how I connected my Raspberry Pi when we worked on the Oil Tank Vision project. For these external video sources, I now use an Elgato HD 60S adapter. This device connects HDMI to a USB adapter, effectively converting any device into a “webcam” for my PC. I previously used the Elgato HD60, but this device tends to lag at higher resolution and the throughput on the 60S has been superb.
Elgato Stream Deck
Do not pass go, if you want to get SERIOUS about streaming I cannot recommend highly enough the Elgato Stream Deck. This little USB-connected device will automate your stream and you will be MUCH happier for it.


This is my favorite device that I use for streaming. There are 15 programmable LCD keys with customizable images on the device. Use it to control OBS, play sound effects, run applications, play music, send tweets, and a LOT more. Each button can trigger one of these actions OR host a folder of MORE actions, meaning you can have infinite depth to the configuration of this device! I’ve been working on a project over the last week to add custom actions to the device, and continue to be impressed with the thought and design in this product.
Oh, and yes there is a smaller 6 key Stream Deck available. Don’t get that one, you’re going to get about 20 minutes into using it and think “rats, I wish I had more buttons” Seriously.. I wish there was a 30 button Stream Deck available, because right now I’m thinking of getting a second stream deck JUST for managing all of my sound effects.
Software
I continue to use the Open Broadcaster Software (or OBS as you’ll hear me and others shorten it) to produce my stream. There are a number of alternatives available, including StreamLabs OBS (or SLOBS for short) and XSplit. Neither of these tools felt as robust or capable to me as OBS, and the conversion process from my stream setup to those tools was too much of an uphill battle for me to even consider.
OBS Plugins
There are a handful of plugins that I use with OBS that simplify things in production of the stream. Most of them are the defaults that ship with OBS, plus the plugin for the Stream Deck. If you’re having guests on your stream, you’ll want to consider:
obs-ndi – NewTek NDI integration
This plugin is indispensable for folks who want to bring in remote co-hosts. The NDI protocol is a standard for trafficking video and audio data, used by devices like the NewTek Tri-caster. Of more interest, Skype now has native NDI support. This means that I can configure my Skype calls so that the video of my co-host is captured and imported DIRECTLY into OBS as a video source.
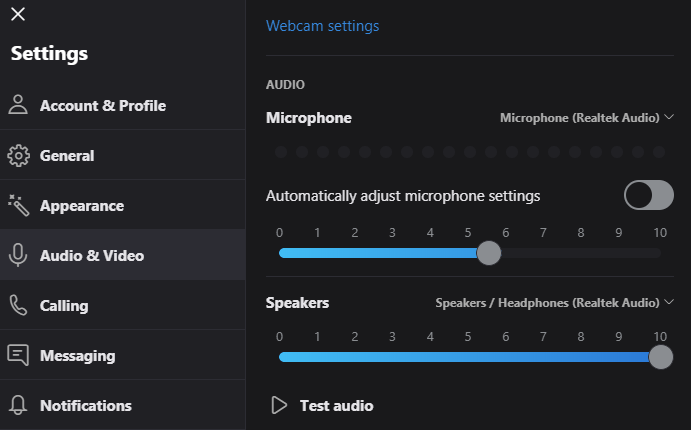
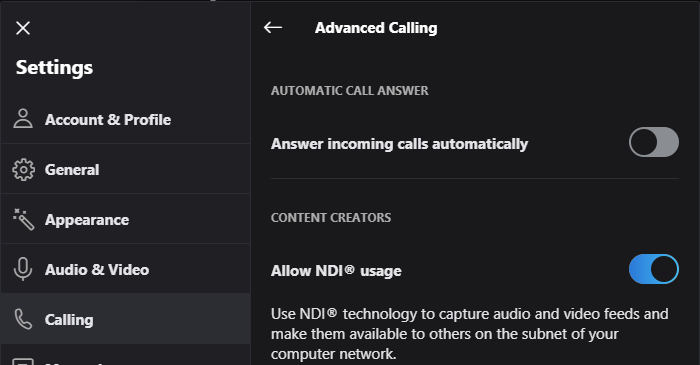
You can configure Skype to output the caller’s camera as NDI under “Settings – Calling – Advanced Calling – Allow NDI Usage” as shown in this image:
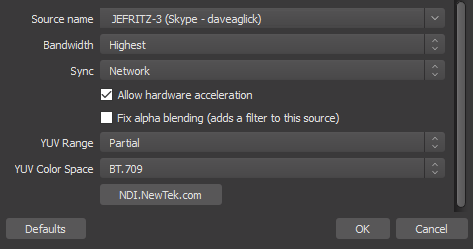
I then can add an NDI source to my OBS configuration and configure that source to grab from Skype:
I still need to capture a shared screen from the Skype caller separately as a shared screen is not available as an NDI source from Skype YET. I have a feature request submitted to the Skype team requesting this.
On-Screen Widgets
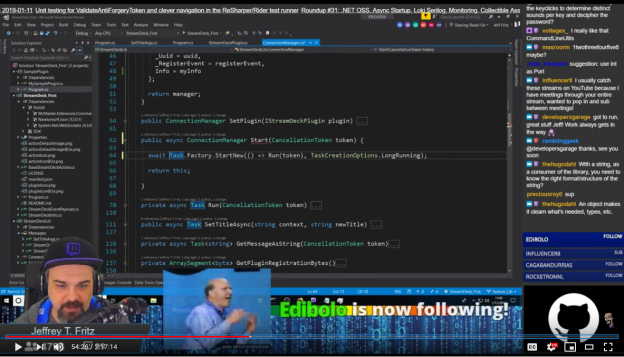
What’s with Steve Balmer and the ‘Developers Developers Developers’ bit on screen? How do you embed chat? The list of stream events on the right-side, how did you do that? Why is there a ticker of GitHub commits?

These are all web-based widgets that are added as “browser-source” elements in OBS. The alerts, like Steve, the embedded chat, and the event list are from StreamLabs. These are easily configured and StreamLabs will give you a URL for your widget to use in your OBS browser source.
I’ve looked at StreamElements for these widgets, but it feels like so much configuration using their online canvas to achieve a similar effect. Additionally, StreamElements wants to own the entire stream layout experience which makes integrating with other sources less flexible and even prohibitive if you want to do something that they cannot provide.
The GitHub ticker, follower-goal, follower and viewer counts that you see on my stream are all custom widgets that I built as part of my Fritz.StreamTools project. This project is an ASP.NET Core web application that runs inside of a Docker container for me, and I host the web pages it emits in OBS as browser sources.
Chat Bots
I’ve tried several different bots over the last year. Initially, I looked into using a chatbot to help with moderation and provide some automated interaction with the chatroom.
I started with Nightbot, and found it serviceable for my initial needs and then I found it a little overbearing after a while. The auto-moderation was too aggressive in how it responded to folks and the configuration of features, while expansive, was too much for my needs.
I then used the StreamElements Bot for a while. This is a nice bot, and delivers most of what I need, but I’m a software developer. I want something that does AI and integrates with the more software engineering topics of my stream…
So I wrote the FritzBot. This is a chatbot that is part of my Fritz.StreamTools project and we have slowly added features to it over the last year. Currently the bot supports these features:
- AI-driven question and answer. The bot will grab any statement that ends with a question mark (?) and send it to the Azure Q&A service to determine if there is a matching answer in my FAQ. If it finds a similar match, it returns that message to the chat room. I think I currently have the sensitivity of the match too low, as it returns a number of false positives to the chat room.
- Image Detection and Reporting – I allow viewers to post linked images into chat and this features, that I wrote with Scott Cate after Build 2018, will inspect the link and use Azure Vision API to report the content of the image to the chat room. We could give folks timeouts or bans based on the content of the images they post, but haven’t written that feature yet.
- URL inspection and reporting – similar to the image detection, this is a simple HTTP request to get the title of a URL linked in chat. This way, we give viewers some idea what is behind a link posted to chat.
- Project status – This is a simple command that stores a block of text with the !project command so that viewers late to the stream can be told what we’re working on. Only moderators and the broadcaster can set this text.
- Code Suggestions – I am actively working on this feature, and it is the culmination of a LOT of integrations and work. This command, triggered with the !code allows viewers to send code to my task list in Visual Studio 2017. We’re building a few more features into this, and getting close to a minimum-viable-product release.
Green Screen and Chroma key
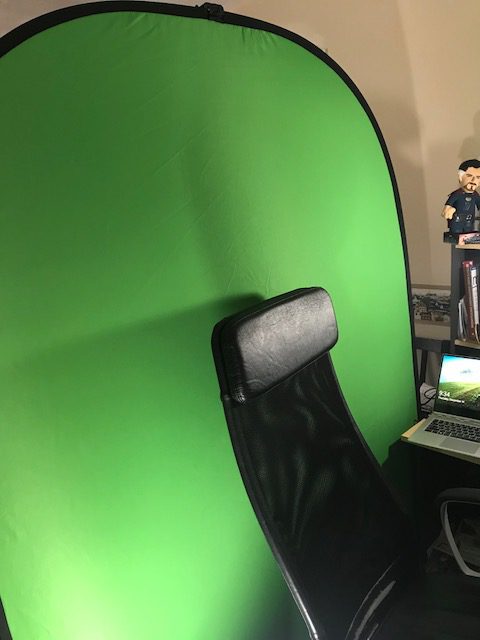
I use a green-screen behind me EXCLUSIVELY. It is so handy, and lets me do all kinds of special effects. When you see me at the beginning of my stream, sitting in my office, that’s a LIE! That’s a photo of my home office that I swap in for my background.
My green screen is a Fovitec StudioPro green/blue pop-out muslin backdrop held up on a photography backdrop stand. I mounted the screen in landscape orientation so that it covers the space around my head and torso with plenty of room to the sides.
The green-screen coupled with the chroma key filter on my webcam source in OBS allows me to remove everything that matches the green color. Right-click on your webcam in OBS and choose Filters, then you can add the chroma key filter. My current settings for this filter are below:
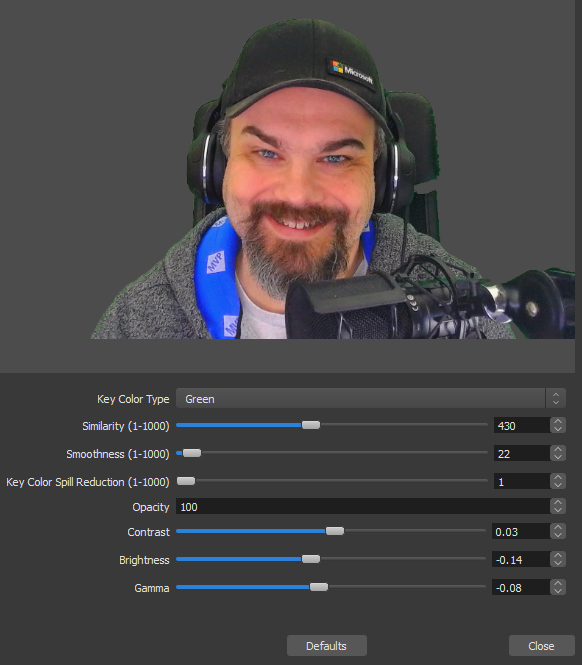
Eagle-eyed readers will notice that the green square in the Microsoft logo on my hat is missing. The chroma key filter makes ALL green transparent, including that square. I’ve played games with this by wearing green shirts or using a green cup so that it appears that I’m transparent or drinking for a missing cup. Fun stuff…
Summary
This is JUST my configuration, and I’m sure I missed a thing or two. I know folks have read my previous blog post about my configuration and have emulated a bit of it to start their own streams. I’ll add another post in the near future about some of my other configurations for exporting to YouTube and other common streamer tasks.
This is an ADVANCED configuration, and you don’t need all of these bits to product a good stream. I have a bit more of a produced look and feel, thanks to these tools. Invest in as much or as little as you can afford and give live-streaming a try. You might like it.
I’m always available on Twitter, my Discord server, and on my Twitch channel to answer questions about streaming if you want to get started.