For the last year, I’ve struggled with a pair of questions I get from my Twitch and developer communities:
How do I make my Twitch channel more discoverable?
What is an enterprise scale Blazor application that I can find on the internet?
… and since November 2020, I have been answering both of these questions with the same application, and its called KlipTok.
Fritz introduces KlipTok on the first stream in November 2020
KlipTok is an application that indexes Twitch clips from streamers and presents them in a social media friendly way so that you can catch up on your favorite content, discover new content, and discuss with friends your favorite clips. KlipTok makes video more fun.
I’m writing this blog post live on stream on July 23, 2020 with about 100 folks watching over my shoulder. We’re discussing some of the techniques that I use to assemble and broadcast my regular Twitch stream, and I wanted to share some of those links and features with you.
Let’s start with OBS plugins and tricks that I use.
I broadcast and produce video using OBS Studio, a free and open-source project. They have a patreon available to support the development of this valuable tool that so many streamers use. I encourage you to support their project with a donation.
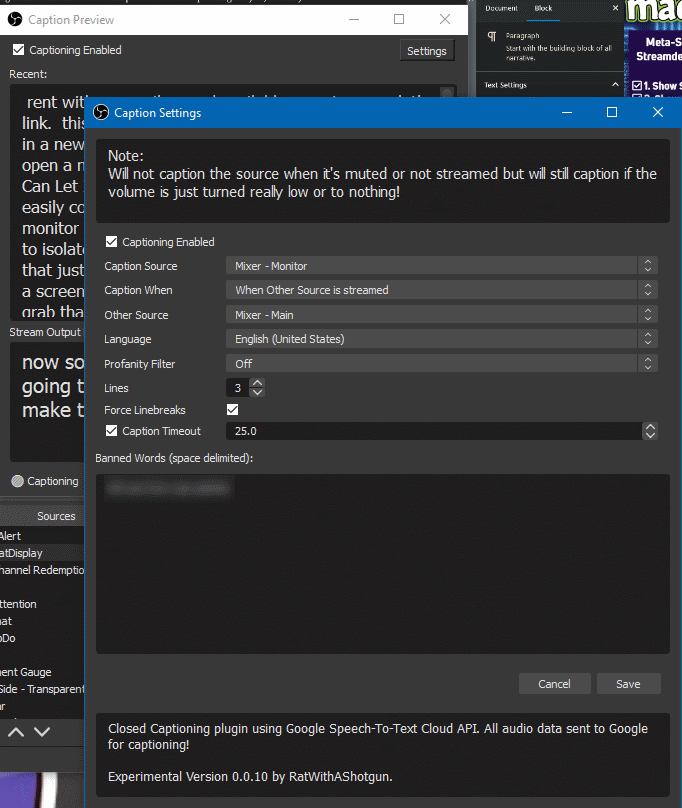
1. Closed Captioning in the Cloud
Everyone who tunes in to your stream should be able to participate, especially those folks who might not be able to hear you or people who don’t primarily speak your language. There are a number of different plugins and extensions that will provide closed captioning for you, but they have accessibility issues EXCEPT for the Twitch video player closed captioning.
Twitch’s video player has a keyboard accessible closed-captioning button and it also allows the viewers to change font and color. Importantly, screen readers can access this content AND the captions persist in the video archive.
I recommend using the Cloud Closed Captions plugin from ‘ratwithacompiler’ and available on GitHub. Once added to OBS, you can easily configure an audio source to monitor and create captions from. This allows you to isolate just your microphone from any music so that JUST your voice is transcribed.
Configuration of the Cloud Closed Caption plugin in OBS Studio
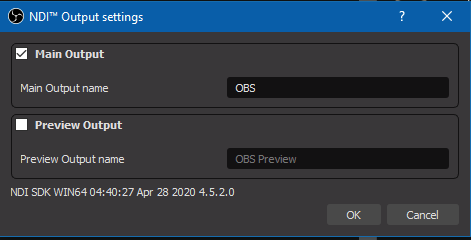
2. NewTek NDI Plugin
I connect OBS Studio to output video to Skype, Microsoft Teams, and other communication software as well as to bring video in from other video sources on my local network. NewTek makes their NDI video streaming technology available for free and you can connect it OBS with the OBS-NDI plugin and run the NDI Tools to begin piping video into and out of your favorite communication applications.
NDI Output Settings from OBS Studio
Installation of the OBS-NDI Plugin allows you to both export video as a streaming video source, and also consume a NDI streaming video as a source in your production. This screenshot above allows you to configure your output from OBS.
The ‘Add Source’ dialog with NDI Source now available
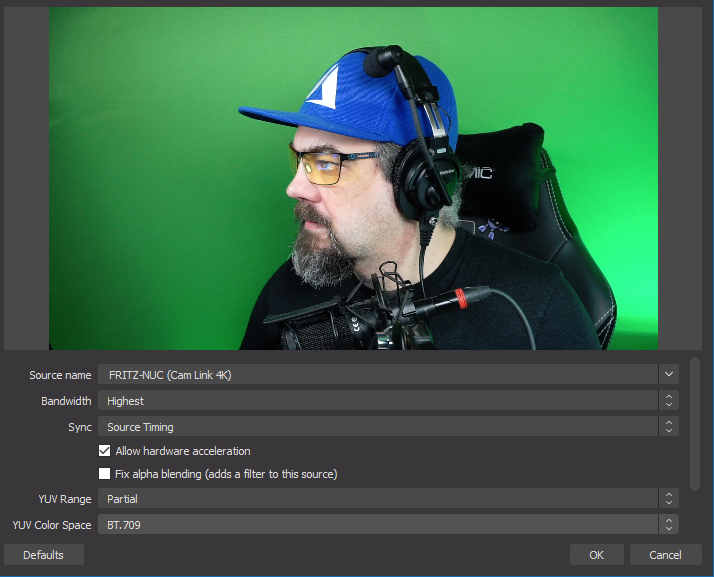
When you add an NDI Source to a scene, you can choose the streaming source and configure it in a screen like the following:
Configuring an NDI Video Source for a scene in OBS
The ‘Source Name’ is the name of the NDI streaming video that you want to capture. Bandwidth and Sync effect the connection speed and delay in your video. I highly recommend pushing this to ‘Highest Bandwidth’ and ‘Source Timing’ for real-time video interactions.
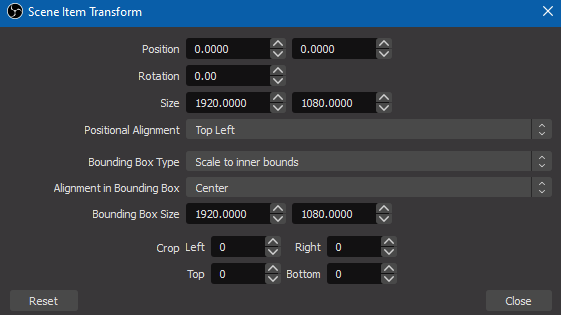
Finally, when you embed one of these NDI sources in OBS, you must use the ‘fit to frame’ and Scale to Inner Bounds features to ensure any reduction in bandwidth does not skew the size of your video. Right-click on the video-source, choose Transform – Edit Transform and set the ‘Bounding Box Type’ to ‘Scale to inner bounds’. You can also use the Ctrl+F hotkey to force this behavior.
3. Custom Transitions
I recently re-themed my stream with new backgrounds and a cool custom transition (or stinger as folks in the TV biz call it). My friend Jaynius Gaming put together these assets and I am now able to configure a webm movie file to display as my transition between scenes.
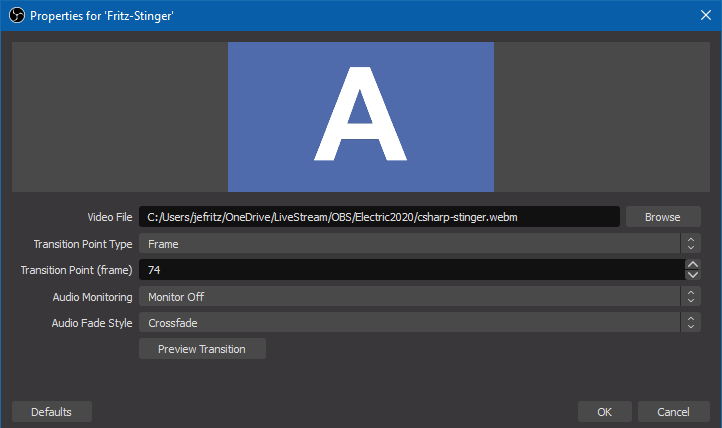
You can add a video file to be used as a transition by clicking the + underneath the ‘Scene Transitions’ header in OBS Studio and configuring in this screen:
Custom Transition Configuration screen
I have added my transition animation and specified the exact frame when the screen is completely covered to change from one scene to the next. For my transition, which doesn’t have any audio, I do not want any audio changes or fading between scenes. I can click the ‘Preview Transition’ button to test the animation.
My new custom transition in OBS
4. Move Transitions
Fade and cut transitions in OBS Studio are simple but not too elegant. I’ve learned how to make my scene transitions look a little more fluid by using the Move Transition plugin. With this plugin, any matching video sources from one scene to the next will gracefully move to their new locations when changing scenes.
Configuration of the Move transition
There are a bunch of options here, but I use it with the default configuration to allow my content to move around the screen as I change scenes. You’ll see this when I transition between the various full-screen background scenes.
Sample of the Move transition at work on my stream
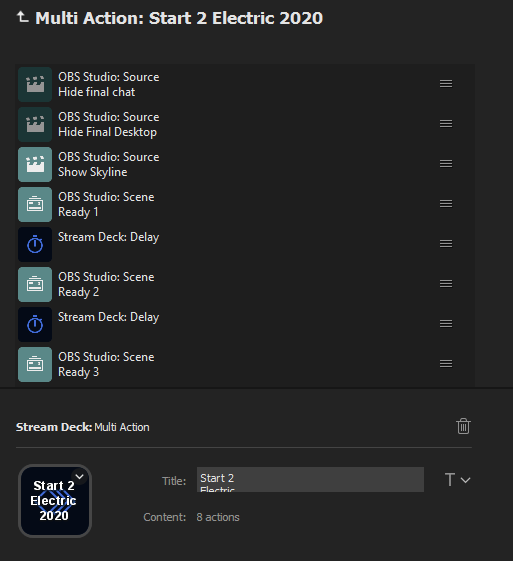
5. Multiple Actions in StreamDeck
The next technique is a trick to make several animations appear as one fluid transition without having to press a bunch of buttons and manually trigger interactions with OBS Studio. The StreamDeck software has the ability to trigger multiple actions from one button press. Here is the set of actions that I trigger for the animated GIF above:
The Multiple Actions configuration in StreamDeck
Under the ‘StreamDeck’ actions section you can choose ‘Multi Action’ and configure one button to trigger multiple OBS Scenes. In the above Multi Action, I hide the sources that I don’t want to appear and start activating with a timer each of the scenes the compose the overall animation. The timer is set to the duration of each animation segment.
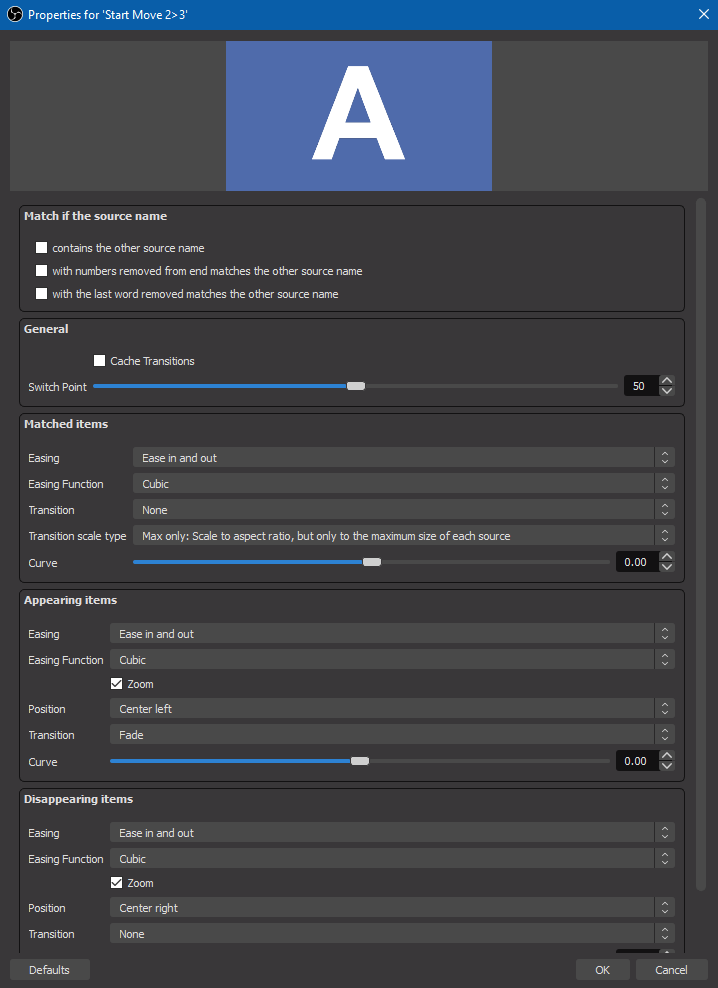
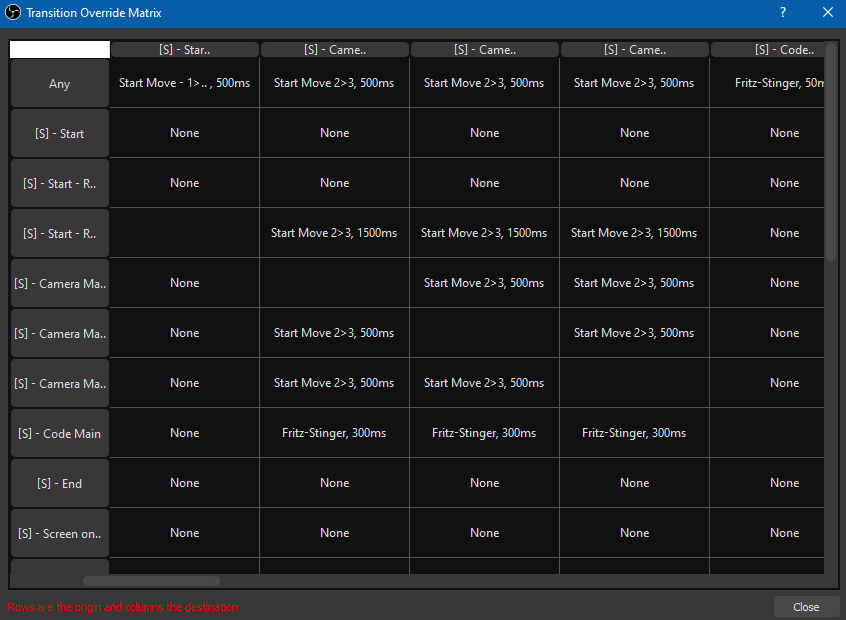
6. Transition Override Matrix Plugin
With all of these new techniques to animate and transition between scenes in OBS Studio, we will want a little more control over how each transition animation activates between scenes. The Transition Override Matrix plugin allows you to specify the exact animation to be used from one specific scene to another.
The transitions for my stream to effect the various animation and my custom stinger
The scenes listed down the left side, in the rows are the source scenes or where you will be transitioning FROM and the columns are the scenes that you will be transitioning to. Right-click on a box to set a specific transition to show when changing between those two scenes.
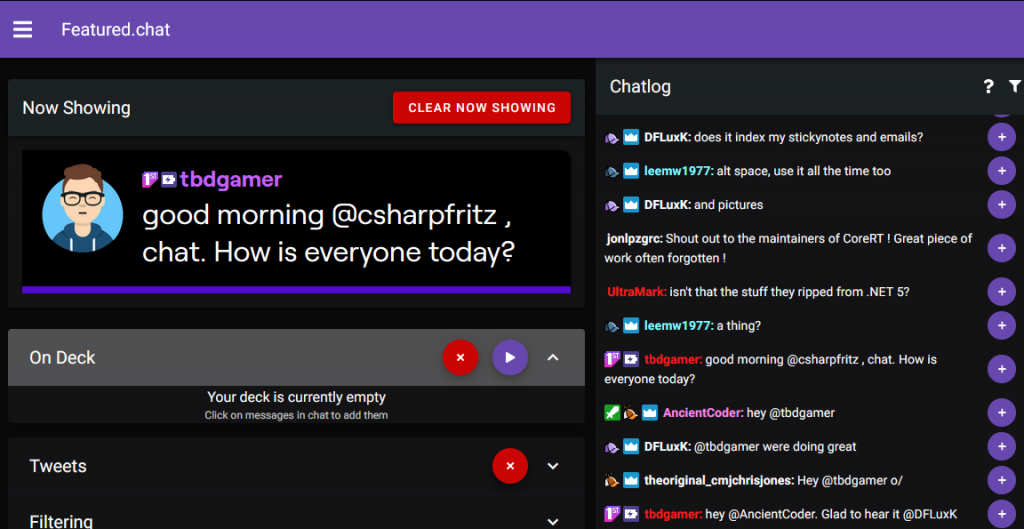
7. Featured.Chat
The chat room on Twitch is a phenomenal resource and when we’re in Ask Me Anything mode, I want to be able to highlight the current question and answer it clearly on video. Featured.Chat allows me to review the chatroom content and queue up messages to appear nicely on screen.
Featured.Chat message on screen
Featured.Chat is maintained by Slevinth Heaven, and is embedded in OBS as a browser source. I can select messages and put them live on screen using their chat console in another browser:
The Featured.Chat Administration console
I have mine configured with a notification bell so that if a moderator puts a message live on screen, I will hear and recognize it.
Summary
These are techniques that I’ve used in 2020 to make my video production look unique and appear more professional for my viewers. There are tons of OBS Plugins that you can download and try out for recordings or live streams. What are some of your favorite tips for getting more out of OBS Studio? Let me know in the comments below.
After writing my previous post in this Minimal March series, it was pointed out to me that my approach is still a little bit of ‘gatekeeping‘. I was using a very expensive machine with lots of memory and drive space in a virtual machine. What about those folks that don’t have access to these resources? Let’s knock down those doors and show that ANYONE ANYWHERE can be a .NET developer.
I set the following parameters for myself, to ensure that I was getting a computer that just about anyone could acquire:
Purchase a laptop at my local discount retail shop, a Walmart in my case.
Spend less than $200
It must be a Chromebook – this is now very common in high-schools here in the US
Configure it with .NET developer tools and work on productive software on my Twitch stream
I wrote this tweet roughly a week ago about the state of .NET development that I was seeing on Twitter:
Seeing a LOT of folks online who still believe .NET is: Windows only Visual Studio only
I’m thinking of running “Minimal March” – all .NET Core and Blazor on stream with vim and command-line tools. Let’s show folks how cool, simple, and fast .NET tooling is
I see ‘Minimal March’ as a developer challenge for me, I’m someone who has spent the majority of the last 15 years working in a version of Visual Studio and C#. Let’s take away those comfortable and productive tools and expose me to more operating systems and more ways that folks can write applications. In this post, I’m going to outline the parameters of this .NET development event and show my initial configuration on Linux. I built this configuration live on my Twitch stream on March 1, 2020.
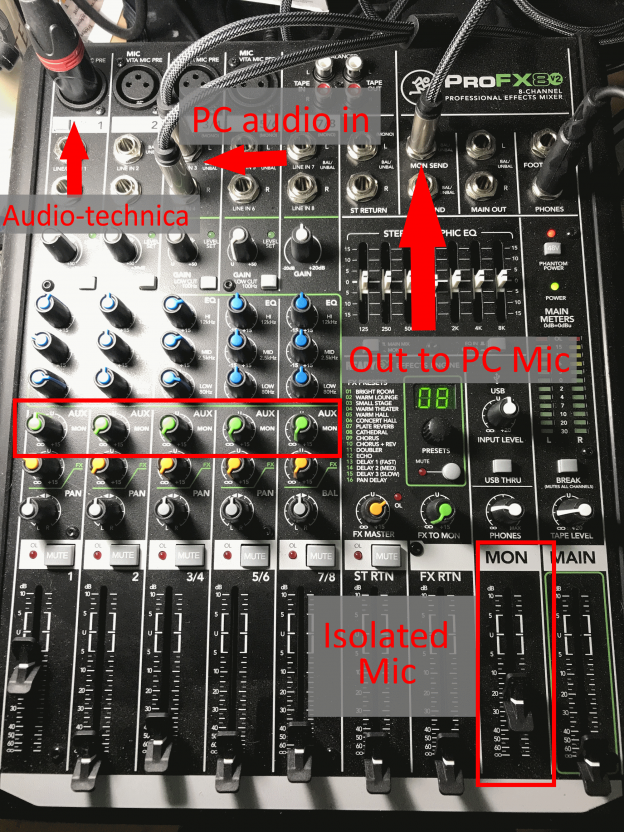
I was pretty excited yesterday because a new audio cable arrived for my Mackie ProFx8v2 mixer. How and why would I be excited to receive a patch cable? Why does Fritz need an audio mixer, and should I get one? In this post, I’ll show you how I have my mixer configured, the pros and cons of a mixer, and what this latest cable allows me to configure now.