

Previously, I shared some code that demonstrated how the new PDF report feature was built for KlipTok. In reviewing the feature, I wanted to give it a little more value. When you read a report generated from KlipTok, I want you to know that it was genuine and accurate data. I started researching the ability to stamp or put an authentic indicator into the report so you could tell it was a real report from KlipTok. I found three techniques with IronPDF that were each amazingly easy to implement and gave different experiences when reading the PDF. Let’s take a look at each technique: watermarks, annotations, and digital signatures.
Adding a watermark
The most visible and easiest to visualize and pass on is a watermark. Back in the “old days” folks would print letters on paper that had an image or text hidden in them so that you could verify it was an official document. You’ll find this technology still used in bank checks and in paper currency, with hidden images that are only visible when the paper is held up to light.
With a PDF watermark, we can place content with a lower opacity on-top of or behind the content of our PDF. A very cool technique that I can use to put a light gray KlipTok logo over the report so that folks know it’s official.
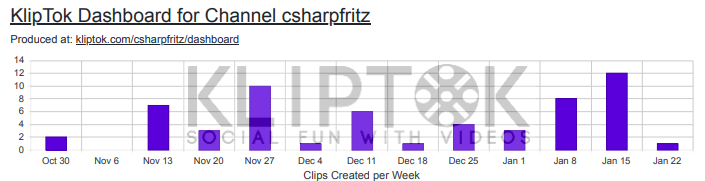
KlipTok logo over a bar graph in a PDF
I inserted this watermark logo with a few lines of code added to my pdf generation code:
private static void ApplyKlipTokWatermark(PdfDocument doc)
{
  var watermark = new HtmlStamper("<img src='https://localhost:5001/wordmark_subtitle.png'/>")
    Opacity = 20,
    VerticalAlignment = VerticalAlignment.Top,
    HorizontalAlignment = HorizontalAlignment.Left,
    VerticalOffset = new Length(1, MeasurementUnit.Inch),
    HorizontalOffset = new Length(2.5, MeasurementUnit.Inch),
    IsStampBehindContent = false
  };

  doc.ApplyStamp(watermark);

}
That is a pretty clear definition of a watermark. The HtmlStamper class defines the HTML that will be placed on the document, along with a location using Horizontal and Vertical alignments with offsets along with an opacity for the content. The final parameter, ‘IsStampBehindContent’ determines if this will be placed on top of the PDF content (like in the above sample) or should be placed behind the content like below:
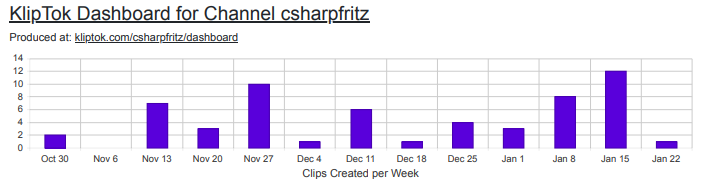
Watermark underneath the opaque graph and not visible
Yea, the graph is opaque so we can’t see the content underneath of it. For this watermark, let’s keep it on top by setting ‘IsStampBehindContent = false’
PDF Annotations
The second technique we could use would be to introduce a PDF annotation. This allows us to add a sticky note to a document with additional information that is only available when viewed electronically. There are configuration options available that will allow viewers to be able to include the annotation on a print out, but for my purpose, I want this to just be a check available electronically.
I added another simple block of code to my PDF rendering class, to add the annotation before the PDF is delivered:
private static void AddDatestampAnnotation(PdfDocument doc, string channelName) {

  var annotation = new IronPdf.Annotations.TextAnnotation()
  {
    Title = "Rendered by KlipTok",
    Subject = "Genuine KlipTok Report",
    Contents = $"This is a genuine report from KlipTok for the Twitch channel {channelName}. It was rendered on {DateTime.UtcNow.ToString()} UTC",
    Icon = IronPdf.Annotations.TextAnnotation.AnnotationIcon.Help,
    Opacity = 0.2,
    Printable = false,
    Hidden = true,
    ReadOnly = true
  };

  doc.AddTextAnnotation(annotation, 0, 550, 750);

}
I really like how easy to read these APIs are from IronPDF. I created a TextAnnotation object and set the title, subject, contents, an icon and some other visibility preferences. I the add the text annotation with a method called ‘AddTextAnnotation’ with the page number, x and y coordinates from the bottom left corner of the page.
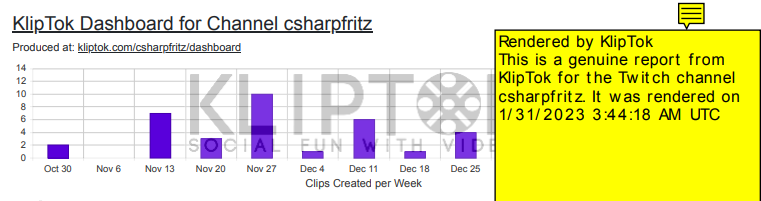
PDF Annotation displayed over the graph when opened
That’s nice… but a little too much for this document. Can we do something a little less intruding over our content and still show some authenticity? Let’s check out a digital signature
Adding a Digital Signature
Digital signatures are the ultimate in proving that a file or a document came from a genuine source. This website you’re viewing right now is protected with Transport Layer Security and signed with a certificate. Let’s see what’s involved in adding a digital signature to our KlipTok report.
var signature = new IronPdf.Signing.PdfSignature("kliptok.pfx", "MY-PASSWORD") {

  SigningContact = "info@kliptok.com",
  SigningLocation = "Philadelphia, PA - USA",
  SigningReason = "Authentic KlipTok Report"

};

doc.SignPdfWithDigitalSignature(signature);
That is CRAZY simple. We create a PdfSignature object by pointing to our certificate (PFX) file, with the appropriate password for that certificate (my password is left out here to protect the innocent). I added some information about how to contact the signer, where the signing took place, and a reason. I could have added a visual signature image to go with this, combining features of the watermark technique from above.
Summary
I like the watermark and I like the digital signature techniques to prove KlipTok generated these reports. Until I find someone attempting to forge KlipTok reports, I’m going to stick with the watermark technique. It’s simple and looks good on my document.
The IronPDF APIs proved again to be easy to read and simple to implement. I continue to be impressed with the power provided and how thorough their examples are. I’ll be wrapping up this new watermark and deploying it to KlipTok very soon.