Over the last month or two, I’ve been investigating various tools that help .NET developers generate PDF documents. In particular, I want to be able to create a few PDF reports for the KlipTok application. I compared a set of four popular tools (IronPDF, iText, SyncFusion, and Aspose) and published a YouTube video recently to show off the results:
In this post, I want to show the code I wrote for the winning IronPDF renderer and explore some of the features as I prepare to connect it to render a report from the Streamer Dashboard page of KlipTok.
Why not just print a PDF of the dashboard page?
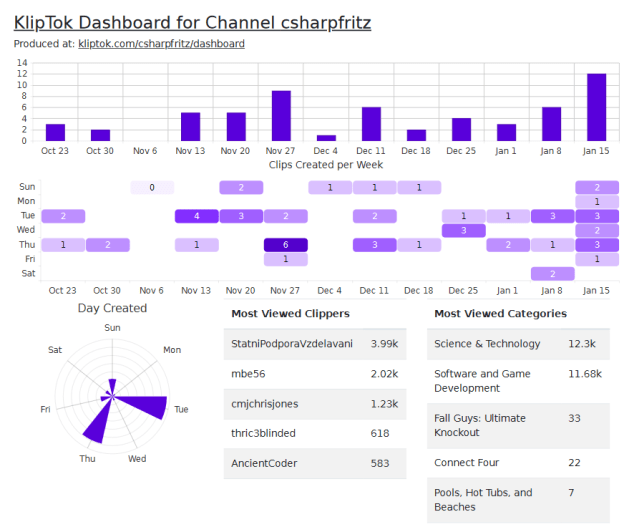
The dashboard on KlipTok is rendered by JavaScript and WebAssembly. In the tests from the comparison (source code on GitHub) I originally loaded the full-featured sports website ESPN.com with code like this:
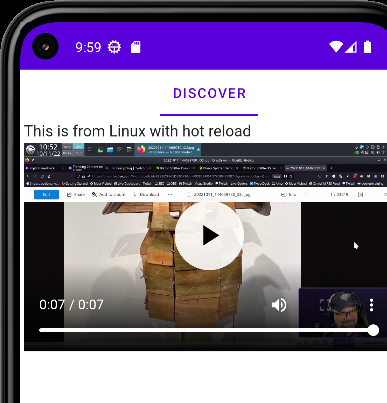
When I attempt to simply update this code to render KlipTok at kliptok.com, I get the following result:

Simple KlipTok Rendering – Only the splash screen renders
Clearly, I need to dig in a little further and just attempting to render the Blazor Webassembly site is not going to work. I also tried a few configuration options:
No.. no dice. I kept getting the same splashscreen again and again. I tried extending the timeout periods, thinking I had a race condition where the page wasn’t finished rendering. Let’s take a look at some of the IronPDF features that I can use after I do a little refactoring of KlipTok to get this rendering.
Additional IronPDF features are going to allow me to format the new KlipTok dashboard page nicely for printing. Let’s take a look at some of these features and apply them to the static KlipTok page used for SEO.
IronPDF document rendering options
The first feature I activated was visible in the test code I used above, EnableJavaScript. This feature is intended to allow websites that layout their pages with a framework like React, Angular, or Vue to perform their layout before the PDF is rendered.
I also attempted to use the RenderDelay feature to render KlipTok. RenderDelay directs IronPDF to wait a specific number of seconds to wait before rendering a PDF. Usually, IronPDF will render immediately after the HTML is loaded.
I also added a TextHeader to the code block above. This is very cool because we can add some information about the content of the page inside the header. In this case, I added an “As Of” date. I could also add a TextFooter with similar LeftText, RightText and CenterText options to place content in the footer. Even BETTER, I can use an HtmlFooter or HtmlHeader to place an HTMLFragment in the header or footer. I’m going to use a little bit of HTML with the {page} and {total-page} macros to place a pager in the footer of the pages.
There are MarginLeft, MarginRight, MarginTop, and MarginBottom properties that you can use to set those margins around your content in millimeters. I found a setting of 10mm in IronPDF with a margin of 0px in my HTML content achieved a nice balance between stretching the content to fill the paper and some reading room around the edge of the content.
By default, IronPDF attempts to render a print media version of a website. You can force the CSS media to screen mode by setting the CSSMediaType to PdfCssMediaType.Screen and you should render the same content in your PDF that you see on the screen.
Additionally, you can force IronPDF to render a smaller version of the website by setting the ViewPort size in pixels with the ViewPortHeight and ViewPortWidth options. It’s a good idea to tinker with these two settings and the FitToPaperMode option which lets you specify how you would like IronPDF to place content on the page. I liked setting a large ViewPort and setting FitToPaperMode to FitToPaperModes.AutomaticFit so that the page content will be stretched to fill the ViewPort and then rendered on the page.
Finally, you’re going to want to specify the paper size to render the HTML content to. With a PaperOrientation setting for landscape vs. portrait, and a PaperSize property as well, you have a wealth of options for the format you wish to deliver.

The SEO-optimized version of KlipTok rendered as a PDF with margins, header, and footer.
Just the beginning…
I had my problems getting the KlipTok content that was built with Blazor Web Assembly to render using IronPDF. Fortunately, I’m in a process of refactoring the location and delivery of Blazor components in the application and I can probably move that dashboard content to server-size Blazor and render it in the SEO version of the website.
In my next blog post, I’ll move those components and configure IronPDF to render content as an ASP.NET Core Minimal API running on Azure using the format I just defined in the code above.