As part of a demo to show a complete interconnected .NET ecosystem from IoT to the Cloud, I assembled a demo with the following components:
– Raspberry Pi 3b (ARM32 processor, Wifi, 4GB RAM)
– Touchscreen case from SmartPi-Touch
– Azure Container Registry
– GitHub Repository
– GitHub action
– Docker
– Docker-Compose
– .NET 7 / ASP.NET Core / SignalR Core
The goal of this demo is to show how a connected IoT device, a Raspberry Pi, can run unattended and receive automatic updates from GitHub, Azure, refresh .NET content on a screen with no interruptions.
Prior to writing the software for this demo, I followed all of the instructions for the touch-screen and mounted the Raspberry Pi inside the case it provides. This allows me to connect a keyboard and mouse as well as a power cable and work on the Raspberry Pi as a typical desktop workstation.
Note: This blog post are the notes from my construction of this demo. I typically present and show this content on-stage and it is easily my most complex demo with moving pieces on a Raspberry Pi device that I show in my hands, Azure Container Registry, GitHub Codespaces and GitHub actions. To make the demo a little more interesting, I’ll update some CSS (sometimes suggested by the audience) in the GitHub repository using GitHub codespaces on stage and the Raspberry Pi will update with the new look automatically. I’d like to record a video showing this demo and update this post with a link to that demo
Step 0: Configure an Azure Container Registry
I already have one of these at `fritzregistry.azurecr.io`. It was easy enough to configure and deploy with credentials required to access the content. Alternatively, you can also use the GitHub package repository features and store containers there.
Step 1: Configured Docker on the Raspberry Pi
These instructions originally appeared at: https://raspberrytips.com/docker-on-raspberry-pi/
On the Raspberry Pi, I downloaded Docker with this command when running as root:
curl -sSL https://get.docker.com | sh
I then added myself to the `docker` group by running this as my standard user `jfritz`:
sudo usermod -aG docker $USER
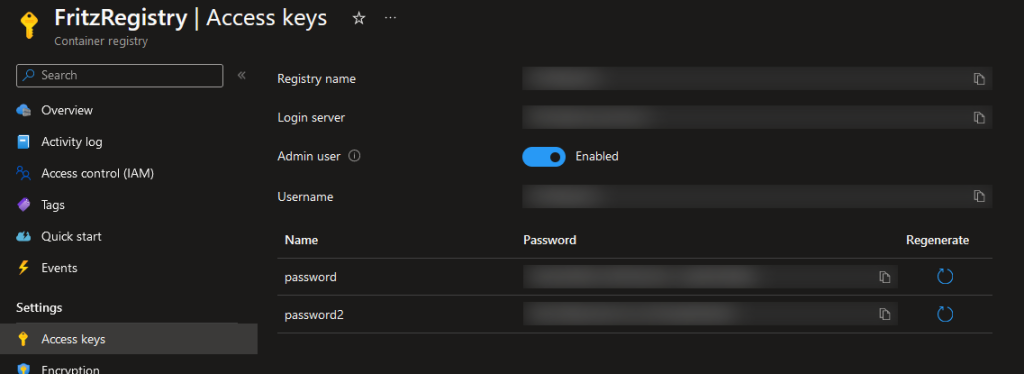
To get connected with the Azure registry, I logged in with this command and specified the registry name, the user id and password displayed on the Access Keys panel:
I could then login to the registry with these credentials on my Raspberry Pi by executing
docker login
This generated a `/home/.docker/config.json` file that will be used to login to my private Azure registry.
Step 2: Configured Docker-compose
For this system, I want to use Watchtower to monitor the container registry and install updates automatically. In order to configure this with those dependencies, I needed Docker-componse. The prerequisites for Docker-Compose are installed with these commands:
sudo apt-get install libffi-dev libssl-dev
sudo apt install python3-dev
sudo apt-get install -y python3 python3-pip
I completed the installation of Docker-Compose with a pip3 install command:
sudo pip3 install docker-compose
Step 3: Configure Watchtower
Watchtower is a container that will watch other containers and gracefully update them when updates are available. I grabbed the watchtower image for ARM devices using this docker command on the Raspberry Pi:
docker pull containrrr/watchtower:armhf-latest
I built a `docker-compose.yml` file with my desired watchtower configuration:
The `command` argument instructs watchtower to check for updated images every 30 seconds, and the `restart` argument instructs the container to start at startup and always restart when the watchtower stops. More details about how to configure a Docker-compose file are available in their documentation.
Step 4 : Customize the Dockerfile to build for ARM32
The device I have for this scenario is a Raspberry Pi 3B and has an ARM32 processor. That can throw a little wrinkle into things because most systems now target ARM64 processors by default. Not a problem, because there is still support for ARM32 available and we just need to specify it in our deployment scripts.
The application that I will be running on the device is a simple ASP.NET Core application that counts the number of times the screen has been touched. In a more complete scenario, there might be a sensor connected or some kiosk screen wired up that presents information and collects data.
I wrote a Dockerfile for ARM is called `Dockerfile-ARM32` with the following content:
There’s an interesting bit in the middle where I copied in the `.git` folder. This allows my application to grab the latest git SHA hash as a bit of a version check for the source code. That SHA is made availalble on the assembly’s `AssemblyInformationalVersionAttribute` attribute value.
We can then build the container for my ASP.NET Core application to run on the Pi from my Windows workstation using this command:
docker build --platform linux/arm -f .\Fritz.DemoPi\Dockerfile-ARM32 . /
-t fritz.demopi:4 /
-t fritz.demopi:latest /
-t fritzregistry.azurecr.io/fritz.demopi:4 /
-t fritzregistry.azurecr.io/fritz.demopi:latest
and then push to my remote registry with:
docker push fritzregistry.azurecr.io/fritz.demopi -a
Step 5: Configure Docker on the Pi to run the website
By default ASP.NET Core configured port 8080 for the website inside the container. I wrote a quick `docker-compose.yml` script to run my .NET application with all of the configuration I would need:
To ensure that the SignalR bits of my demo would work, I removed a privacy extension from the Chromium browser that comes with the Raspberry Pi device.
Step 6: Configure the Pi to boot into Chromium for the website
In order to configure the Pi device to boot directly into a browser and my application running in the container, I added a file at `~/.config/lxsession/LXDE-pi` called `autostart` with this configuration:
@lxpanel --profile LXDE-pi
@pcmanfm --desktop --profile LXDE-pi
#@xscreensaver -no-splash
point-rpi
@chromium-browser --start-fullscreen --start-maximized http://localhost/
Additional options and the instructions I started with are at https://smarthomepursuits.com/open-website-on-startup-with-raspberry-pi-os/?expand_article=1 where I learned how to write this script.
Step 7: Prepare a GitHub action
I configured a GitHub action to checkout my code and build in ARM32 format with the Dockerfile established previously. This would also publish the resultant container to my Azure container registry:
Success!
Summary
As changes are made to the GitHub repository, the GitHub action will rebuild the image and deploy it to the Azure Container Registry. Watchtower identifies the update and automatically stops the existing application on the Pi and then deploys a new copy with the same settings. With a little SignalR work, the UI updates seamlessly.


